
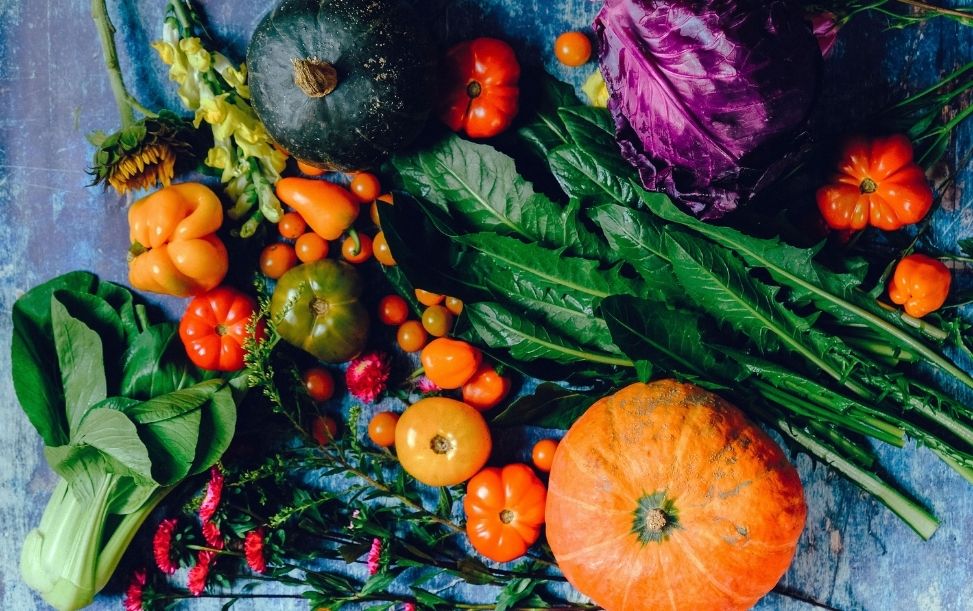

Image: Our current garden includes double swing gates, Raised veggie gardens from Andy’s sheet metal, pond, arbour, trellis and wall garden pots, surrounded by perennial edible herbs and vegetables.
Bed preparation
When starting from scratch these few simple steps will make it easy to get your foundations strong right from the beginning. Raising the gardens above soil level is a good idea to improve drainage, unless you’re trying to grow in sand, in which case, you would find the opposite is true. Whether you’re creating gardens directly on the ground or have raised beds, I suggest you consider these basic steps that I like to follow:
- Mark out where the beds and paths are going, paths should be at least 800mm wide.
- Dig out the pathways and mound this soil where the gardens are going.
- This is a good time to get your main irrigation lines in place.
- Line pathways with cardboard including a little up the side of the beds to cover any grass.
- If you are using raised beds, put them in place now.
- Import high quality garden mix from your local landscape supplies. This should contain loam, compost and chicken manure. This is a shortcut to soil fertility but it’s only the beginning, the quality of store bought garden mixes can vary in PH and nutrients, it’s always a good to ask if they have had an analysis done or meet the Australian standard AS4419. Alternatively, if you are working with your own soil, I highly recommend getting a soil mineral analysis to determine what you’re working with. More on soil minerals later.
- Install your irrigation sub lines and drip/ spray heads.
- Fill your pathways with wood chip mulch.
- It’s good practice to plant perennial herbs along the edges between the garden and the pathway, this helps prevent weeds from finding this place first. The best plants for this purpose are Brazilian spinach, garlic chives, comfrey and lemongrass.
- Depending on the variety of veggie seed you are using, you can either sow them directly into your garden beds or you may need to raise the seedlings in pots first. If you are direct sowing, like a salad mix, then do that now; otherwise simply cover the soil with mulch.

The right plant and the right time of year
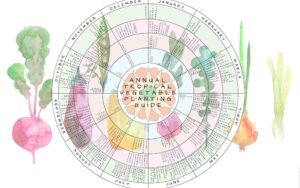
Now these are the big questions! What do I plant and when? After years of research, trial and error of my own, I have created a go to list of the vegetable crops that thrive in the tropics, including when and how. Click on the image below to got to my tropical annual vegetable guide post
The importance of perennials
Perennials are the backbone of growing successful and reliable food in the tropics. I put them around my annual veggie gardens. For a complete list of the varieties, I highly recommend you take a look at the fantastic Incredible Edibles, Tropical Super Food Guide by Earth Mumma, Tonielle Christensen.

Image: A variety of useful perennials I have growing in one of my gardens.
Soil mineralization and fertilisation
Understanding your soil is of utmost importance. I once had a misconception that applying compost to the garden was all I needed to do to grow the best food possible. The idea that building organic matter will solve everything has been superseded among the organic gardening community. Applying composting practices is still very important, however, it’s only one part of the puzzle.
As our understanding of soil and its relationship with plants deepens, we have come to appreciate the importance of mineral balancing. If you are interested in digging deeper into the workings of soil then the research of William Albrecht, the foremost authority on the relation of soil fertility to human health, is a great place to start. I recently read a good book entitled ‘The intelligent Gardener, by Steve Solomon’, that drastically changed the way I appreciate the importance of soil minerals. Basically, in order to grow the most nutrient dense food we need to ensure our soil has all the minerals in the correct ratios. By conducting a soil mineral analysis through a lab we can quickly decipher the mineral levels of our soil and are able to make adjustments as needed. If you require assistance with a detailed soil analysis please let me know, I am happy to help. It’s best to get it right from the start, but it is never too late to improve the quality of your soil.
Worm farming & fertility practices
It is imperative to have the correct ingredients, recipe, time and energy to create amazing compost, otherwise it is wasted effort. Just because it’s black and sticky doesn’t mean it’s going to do wonders for your garden. This is because, if the compost is not fully broken down when applied to soil it can rob the garden of nutrients. The best way to create humus and build organic matter into the soil is through worm castings. Humus is the black stuff in the topsoil that stores minerals and feeds the plants. Worms convert organic matter, be it food scraps, manures, shredded paper or coffee grounds into fertile humus full of microorganisms that do a phenomenal job of providing optimum nutrients to your garden.
Worms can be grown in various homes. My favourite is a bathtub as it offers plenty of space, air and drainage. When making compost, be sure it’s completely broken down and always finish it off with a wriggle of worms. Worm castings (the solid black sticky stuff) can be dug into the beds every rotation <target below> and side-dressed to plants when needed.
Biochar, made by slow cooking biomass in a controlled environment, improves and maintains soil fertility and increases carbon sequestration, this can also be added to worm farms to inoculate the charcoal with organisms that then act like slow-release fertilisers. Bokashi is another effective composting system that ferments food waste into liquid bio-fertilizer, which I also highly recommend.
Seed stock
It’s recommended to use local seeds, as they have been climatized and therefore are more suited to your climate. You can find your local seed saver group at: seedsavers.net/local-seed-networks/. Alternatively, you can buy seeds that are open pollinated or heirloom seeds from the seed supplier closest to your garden. Here in Far North Queensland, Green Harvest in Southern Queensland are my closest quality seed suppliers. We want open pollinated heirloom seeds as they are true to type and can be saved. Seeds saved from fruits and vegetables purchased from large supermarkets are generally grown from hybrid seeds which are not true to type. If we collect and grow those seeds, the fruit we produce, if any, will be of inferior quality, dependent on loads of NPK fertiliser and vulnerable to diseases. Once you have collected your quality seeds, it is best to store them in the fridge as humidity can destroy seeds quickly and the cold will place them in a state of hibernation until you are ready to use them.
Rotational gardening
Rotating crops and companion planting prevents soil degeneration and the progression of pathogens and pests which occur within a single species. Heavy feeders such as potatoes, tomatoes, cauliflower, broccoli, cabbage & sweet corn should be followed by light feeders such as root vegetables, or nitrogen fixing legume cover crops over summer, such as cowpea, being sure to dig it in before it flowers.
The idea is to simply divide your growing space into a number of distinct areas, identifying the crops you want to grow and creating a plan of where they will be planted. Being sure to note which bed they will be moved to in the following season. Every year the plants grown in each of your garden beds should change, so that each group, with its own requirements, habits, pests and diseases, can reap the benefits of new ground.
The basic plan follows the pattern: BEANS, SALAD GREENS, VEGETABLES AND ROOT CROPS. Although, some crops such as potatoes like extra nitrogen, so it’s good to add nitrogen rich fertiliser such as well aged chicken manure when planting.

Image: Companion planting salad mix with marigolds deters pests.
Maintenance
Before the next planting can begin, the soil has to be prepared. Here are some easy steps to follow:
- If the pathway mulch is looking low and broken down (usually only once or twice a year), dig it out and place it on your garden beds. The mulch acts like a sponge soaking up much of the excess nutrients your garden receives and now you can use it as a fertiliser for the new beds.
- Remove most of the bulky plant scraps left over from the previous crop and add it to your compost bays or feed them to your worms or chickens.
- Be sure to detach or move the drip irrigation lines out of the way.
- Using a broad fork or general garden fork to loosen the soil of the bed. Work backwards to avoid compacting the bed as you aerate it. The fork should go all the way in and lift the soil. Try not to turn it over as this disturbs the soil layers and breaks up beneficial fungal networks. The idea is to create a pocket of air below the soil surface. There shouldn’t be any clots or dense chunks of soil left after this process.
- Cover the whole garden with at least 50mm of compost and or worm castings and then dress it with your specified minerals.
- Using a rake to break up any chunks. Create a fine crumble consistency on top to plant your new seedlings or seeds directly into.
- Reinstall your drip lines.
- Refill pathways with new wood chip mulch. Just a note, wood chip mulch is high in potassium so it’s not good as a primary mulch for veggies, but is fine for perennials and trees.
- If seeds are directly sown, a light layer of fine mulch is good to protect the soil from drying out and deters birds.
Growing nutrient rich and abundant veggies in the tropics can be easy, fun and fulfilling. There are a plethora of wonderful, useful and edible annuals and perennials you can start growing right now with a little forethought. As with growing any garden anywhere, the quality of your produce derives directly from the quality of your soil. Affording a little extra effort and consideration in the beginning equates to sitting back and watching your garden grow with little intervention and reaping an optimum yield when it comes time to harvest. I hope this guide has been helpful. Please comment below if there are any areas you would like me to dig deeper into and if you need assistance with a garden layout or plan, don’t hesitate to book in some time with me here.
Fantastic resource for tropical vege gardening thanks Blake 💖🌱✨
Lovely work! Really nice website and great content.
Yes really helpful thank you- I had wondered about using wood chip mulch on paths and worried the tropical rains might wash it away but I’m encouraged to give it a try now.
This is amazing, thanks so much Blake! 💕🌏
Thank you so much for your invaluable information.
Hi Blake, where do you get your detailed soil analysis from? I also live in FNQ
Hi Lee,
I get the tests done with EAL http://www.scu.edu.au/eal I get the NT-PACK-001 it costs about $180. If you have any questions let me know 🙂